Showing posts with label SCAL. Show all posts

Tuesday, August 24, 2010

Boy N Boot

So with my favorite software, MTC, I tried my hand at making a cut file from a photograph…after 8 hours of working on it…here is my first attempt (mind you, I couldn’t find my glasses so my faces are a tad, lets say not so great) :(

100_6329

And this is my second attempt…still need a little more work to get it to where I will like it. Feel free to leave your comments.

100_6329

I think if I can fix my head, I will be very happy with the rest of it, thanks for looking!

Another Monday night making cards

Here’s some cards that one of my younger girls made and allowed me to take pictures of her cards to share with all of you. She did a very good job…be sure to comment below and let her know how good she did. Enjoy!

100_6300

100_6299

Make a card Monday

So we had another Monday night class with 7 wonderful ladies, and 2 sweet younger ladies attending…each one making a few beautiful cards. Our first card of the evening was a scraplift that I saw, and modified it a little with files that I already had, and then I had to even change them a tad to make it the way I liked it, using Make the Cut software, (have I said lately how much I love this program)?

So our first card of the evening was entitled “Snail Mail”, a perfect card for those of us who procrastinate and forget to mail that birthday card or if you always send email, how about a card for that special someone, cause we all know a card in the mailbox would be a great pick me up! Enjoy!

Snail Mail

100_6293 100_6296


100_6302 100_6301

100_6307  100_6311

100_6314 100_6315

100_6317

Our second card of the evening was supposed to be using a technique called “faux bleaching”. It is a really neat technique, however, I thought when it called for glossy cardstock, I thought the writer meant photo paper. Although embossing on photo paper is really pretty, it didn’t work for what I was trying to accomplish. So we decided to table that card for another week and we did a fall card, still using Tim Holtz reinker dyes. We used the Maple Leaf Cuttlebug die cut/embossing folder, photo paper and reinkers. Sentiments for the cards were picked from a variety of stamps that our dear friend Ruby had brought with her…she is a Close to my Heart demonstrator and she has hundreds of beautiful stamps. So enjoy our cards as each one came out a little different.

100_6295 100_6294

100_6297 100_6298

100_6303 100_6305

100_6304

100_6306 100_6309

100_6308

100_6310 100_6313 100_6316 100_6312

100_6319 100_6318

100_6321

Tuesday, August 10, 2010

Laugh Scrapbook Layout

So I found some pictures and when I looked at them, they made me just start laughing, so I thought, I needed to scrap them and that just had to be my title…I hope you enjoy!

On this layout, I wanted to do a class with no paper piecings, a title that was fun and easy to do page for even a beginner and yet still be very eye catching. We used a crimper on the title giving it the corrugated appearance, the title was cut using MTC software or if you have SCAL it can be done with that also, and we placed journaling blocks above our photos, and then the girls were to add their own embellishments to the page.  Let me know what you think…we love to read your comments.

100_6232 100_6233 Hoping to post my layout and maybe a couple of the other girls layouts on here soon. I hope you like this one that Anne N. made…love her embellishments!

Thursday, July 22, 2010

Another Beach/Pool page with adorable penguins

This weeks class ended up being on a Tuesday evening because my beautiful baby girl had her 20th birthday on Monday and wanted to spend the day with me without my having to leave to teach a class, so I thought that was pretty sweet of her. But guess what? As the day went on, she received an invite from a friend she hadn’t seen for a while to go to dinner, so I told her to go and have fun. So class took place on Tuesday evening and it was a reunion of sorts. Our friend from Florida is up for the summer and her and her daughter who lives here both came, and another dear friend who hasn’t been for a while also came, and of course one of my regulars came and so we had a wonderful evening and everyone’s pages came out beautiful.

I hope you enjoy seeing our pages, and how when made with different paper and rearranging the layout, each taking on their own personalities. Enjoy :)

100_6178

Jamie had some beautiful Close to my Heart paper that she used. I love this paper.

100_6179

These next few layouts are Nina’s, Annette’s and Rubies, here we used photo copied cardstock for our mats. This paper came out of a pack and we didn’t have enough for everyone so we photo copied it!

100_6182

100_6183

Usually we chalk or ink all our pieces but this week we only did a little on our tree and used micro black pens and a white gel to add some detail to some of our pieces…they came out so cute, and the added little extra was some hemp for the bow on the bathing trunks, it just added that little extra.

100_6184

Our Palm trees were missing the coconuts…and so with a pair of scissors, not the Cricut, the girls cut these cute coconuts and added it to the layout…how cool is that?

These cuts were made using Myscrapchick penguins…I own everyone of their files! Literally! I used the Make the Cut software to do all of our cuts. I love this program. Learning new things everyday on what it can do.

100_6185

100_6186

100_6188

Be sure to leave a comment…we love to hear from people!

Wednesday, May 26, 2010

Fishing Layout

This weeks class was supposed to be a Fishing Layout, but for whatever reason, I had no one attend class that night! My guess, it was 89 degrees and extremely humid and I think that everyone was just trying to remain cool and that it probably would be too hot in the back of the store to do scrapbooking, but several kits were sold and I still have a few more left if anyone else is interested. I truly love my layout…it is supposed to have a boy or a girl fishing on it, but since I have both girls and boys and they all love to go fishing, I decided to use both of the diecuts on my layout. I love Lisa’s cuts, they are so adorable and easy to put together. This has got to be one of my favorite layouts that I have done in the past few weeks, I hope you will like it also.

This is a close-up of the cutout.

100_5895

100_5897

If you look closely, I used some metalic ink on my title “The Big Catch” I also used my Cuttlebug to emboss the title, I think it just added that little extra to this page.

Recipe:

Right Page

(2) 4  x 12 inch border strip

               1 paper ruler cut at 12 inches each

          (1) 6  x 4 1/2 inch cardstock dark

(1) 5 3/4 x 4 1/4 inch CS light

          (3) 2 1/2  x 3 1/2 inch CS DK

(3) 2 1/4 x 3 1/4 inch CS LT

Left Page

Journaling box 2 1/4 x 4 3/8 inch Dk

2x4 inch Lt

top mats

4 1/2 x 4 1/2 inch DK

4 1/4 x 4 1/4 inch LT

3 x 4 inch Dk

2 3/4 x 3 3/4 inch LT

(2) 4 1/4 x 5 3/4 dk

(2) 4 x 5 1/2 Lt

I love these pictures that I put on here, it is of my son Chris and his brother Sam, they loved to go fishing with their dad. It was nice doing this layout this week for me as Chris’s birthday was 2 weeks ago and he would’ve been 23 years old. So it’s nice to be able to get this picture into the album to be able to share it with it our family. Chris was quite the little “ham” if you can’t tell by looking at these pictures…I am going to make another layout of fishing as I still have a few more pictures I can put on it.

Love you and Miss you Chris.

The day I was working on this layout, our son Sam went fishing and he caught an 18 inch rainbow trout and so as I was looking through the pictures, I found one of their dad, probably 10 or 15 years ago when he caught an 18 inch trout also. Gotta love my fishermen!

100_5896

On this page, I decided to do my journaling on the side and the pictures I chose were ones of my daughters so I could use the little girl diecut on here…she actually was a cutout for roasting marshmallows, but thanks to Make the Cut, I was able to alter her and turn her into a fishing girl. :) Anyhow, in this layout are two Korean students that our oldest daughter, Erica, had in school in China and they came to the USA for the summer with her…in the 6 weeks they were here, we introduced them to many things and one was fishing. They were naturals. Also in these photos is our baby girl “Princess” Hannah…she did really good casting, unfortunately, no fish were injured on this day :)  We had such a good time, the kids fishing and me with my camera! The picture above is a day of fishing with Sam and Dad. I love remembering these fun times and now I have it in my album and journaling done. Enjoy!

Wednesday, May 5, 2010

Tuesday, May 4, 2010

Long lost layouts and some recent layouts

So I have some new girls who have been scrapping with us for a while now and they have wanted to do some of our older layouts but I don’t know where the posts went????? So I am going to post some of my layouts that I have in my albums and that way they can have a visual of how to do their layouts. I hope you enjoy seeing these layouts and also seeing some of the different techniques that we have used.

Our First layout is our infamous Rubber Duckie layout or Bathtime, this class has been done at least 3 times in a year and a half, and of course everyone's layouts have been done differently and used different pattern paper and cardstock.

100_5764

Our next layout is our April Showers brings May flowers….on this layout I once again used my Surecutsalot program to cut the title, and my fence, and our little girl in her raincoat as well as our tulips and daisies. This layout is so cute…I can’t wait to add pictures to this layout.

100_5732 

100_5733

The next layout is a layout for our pets…the picture I have is for our dogs…we currently have 3 dogs, Sheltie, he’s 17, a Yorkie, who is 3, and a new black lab who is almost 4 months. This was a fun layout, I can’t wait to get my cat layout done. Some of the ladies did cats, but I don’t think we took any photos, and they always forget to email me their layouts heheheheh.

100_5736

Sorry for any blurring…I didn’t want to pull out all the pages, and the lighting was pretty good so I think you can see most of the project. If you are doing this layout, this page has (3) 4x4 mats…if you double mat, you would have (3) 4 1/4 x 4 1/4 mats for the bottom.
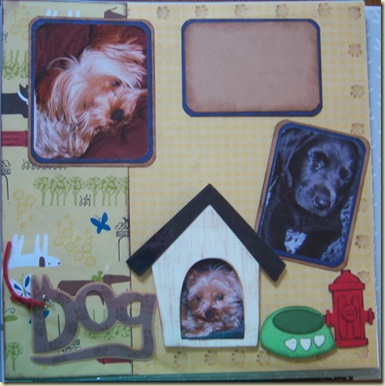
100_5737

On this page, again I like to add chalk…it’s hard to tell in the pictures, but it just makes the paper piecing more dimensional. I love how my little Yorkie fit in the doghouse. The mat at the top of the page is for my journaling, where I plan to put all the things our dogs like…example….<3 going for walks, <3 doggie treats when I’ve been good, <3 love how my master loves me even when I’ve been in the trash, etc. Enjoy!
100_5741

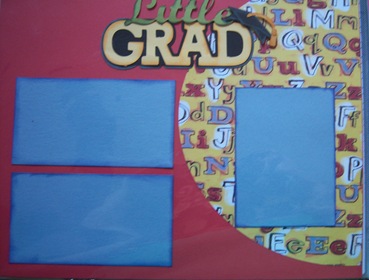
So some of us have kids who are graduating, eighth grade, high school and college and some Pre K and Kindergarten, so we made this layout that could work for all ages….the title…the word little, I used dk green colorbox chalk, and used glue dots for it to have a little pop to it…the word Grad was cut out with a shadow back, so I chalked the front with Amber Clay, one of my favorite colors to chalk with. the graduation cap was chalked lightly with some white chalk and I added the tassel. The mats on this page were cut at 3 1/2 x 5 1/2. the circle was cut in half and used on both pages…if you don’t own a Cricut, all you need is a large dinner plate, trace it on the back of your paper and then cut out and then you cut it in half.

100_5742

Here is the second page along with the first page so you can see how you put it together. I love the school writing paper, this of course will be used for my journaling..my little graduate is popped using dimensionals. The mats on this page are (2) 4x4’s and one 6 1/4 by 4 1/4. Enjoy.

100_5745

this is one of my favorite pages…It is of some happy times with my Mom and my brothers, and sister, niece and my dad, also in the above pic is a picture of my kids with my mom…they love her so much! I haven’t finished stringing my pearl beads, if you look, you can see that I twisted it and made little loops, and that is what I plan to do to finish it on this page…just need to finish.
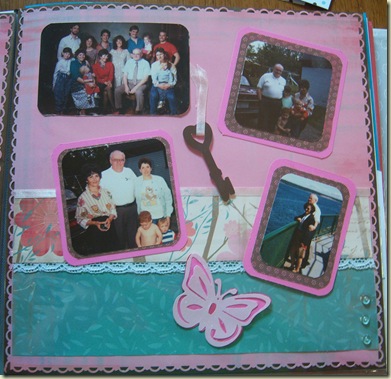
100_5746

On this page is again family members…upper left is a gathering we had to surprise my mom with a family photo…this is the last photo of all of us together that I know of, after this picture was taken I found out I was expecting our youngest girl. Also picture of my boys and my oldest daughter and of course my dad. The edges of our layout was done with the new Stampin up punch…butterfly was cut with glitter paper, using SCAL2, also the key was cut with SCAL2, then I added lacey ribbon, some skittles and later I will add my journaling.

100_5749

Easter layout…I used the cuttlebug to add some design to my eggs…of course we chalked everything. I wish I had used a different bunny…but this one works. In the page below, I used my Bic markers to outline the title and the basket…you can get the holder from Custom Crops…I also have the gel pen holder…I use them a lot.

100_5750